

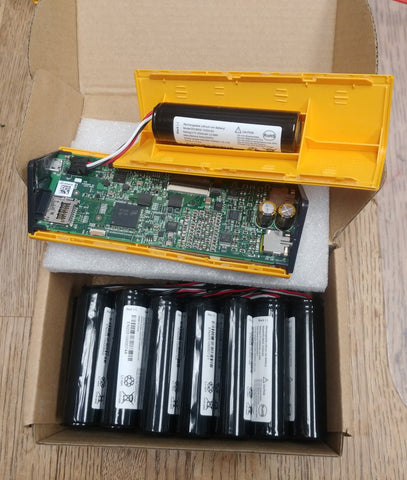

UPDATE August 2026: Pono Player Battery Replacement (DIY).
We constantly get emails about Pono Player battery replacement. Thanks! Email us with your battery and Pono experiences. Somehow we have become the central holding place for all that is Pono (many have 'rubber rot' now on the exterior/ how is your doing?). After many years we have stopped selling replacement batteries but there is hope as compatible batteries are now quite common. Here is what I did to replace my Pono Battery. I am not saying you should do this, but this is what I did and its working. If you wish to try this do so at your own risk.
- The Pono battery is about 2300 mAh or so, at 3.7 volts with a thermal sensor/cable. The good news is that over time these batteries have become very popular. They are easy to find and cheap. They fit exactly into the Pono battery compartment. The wires are the same colors and do the same things. The only issue is the tiny connector on the end that connects to the Pono, these connectors are not known nor obtainable. But that's not a big problem because you can use the original wire and connector from your existing battery- just splice the original cable with that connector onto your new battery. The risk of this procedure is you must destroy the old battery connection. Should this procedure fail it is likely your old battery will not be able to be used again and you will be unable to power the Pono, unless you have another battery for backup. Do not attempt lightly.
- I found a few compatible batteries (without the correct connector). I selected this one (pictured in the coupler example)- https://www.amazon.com/dp/B0H3K92W44 The cost is about $15. Shipping took a couple weeks, however.
-
Another battery option (fast shipping). Confirmed working. Very long wires so this is what I wanted the most. https://www.amazon.com/dp/B09NLHKTKV
-
Here is another one, which works with fast shipping (pictured in the solder example): https://www.amazon.com/dp/B0B9RL5D9M
- Dimensions of the Pono battery are about 68.0 x 18.9 x 18.9mm which is common in 3.7 volt rechargeable batteries. The batteries above should fit exactly, and more importantly I want a nice long cable for install flexibility. Of course one with the correct connector would be preferred (but are not known to be available). If using the coupler and the cable is too short there is a high risk that the Pono will not close/reassemble because the chunky coupler connector cannot be moved to a position with clearance. And now that the old battery cable is cut, there is a risk that it cannot be reattached. So doing this means there is a risk of not having a way to power the Pono. The risk is minimized by soldering instead of using the chunky coupler/splicer.
- I am going to cut off the cable on the original connector on the original battery to use the connector with this battery (cut the connector off the new battery).
- The wires can be spliced, with difficulty, using a tiny 3 wire splicer. I used these- https://www.amazon.com/dp/B0DGLJJRZ5?th=1 Cost about $10 for 10. Soldering is much better (and easier) but I wanted to try an essentially tool-less solution.
- After I snip the wires I can join the new battery with the old connector using soldering (easy) or the splicer (very difficult). The splicer/couple is a little tricky, but I used a pair of pliers to gently slice into each wire as I put it in. When I say "tricky" it is incredibly fustrating! Took an hour or so of trying/testing to get the procedure down. I would have been much better off soldering than using these tiny connectors. Which I verified by soldering as shown below.
- For the non-recommended coupler, insert wire, push down on that end slightly, insert next wire, repeat until all 6 are in there.
- The coupler is small enough that I was able to close the Pono Player but it was tricky I think it depends on where you seat that tiny coupler/ splicer. Of course I measured the voltages and pinouts to triple check that everything was correct and lined up. Pono working fine now with the new battery.
#1- Solder Example. I simply cut the connectors off each battery and soldered the old to the new. Easy and reliable. Less than 30 minutes including to verify voltages etc...
Original battery (black) and new (blue). I want to put the black connector on the blue battery and remove the white connector from that battery.

Cut connectors off.

I remove small amount of insulation and 'tin' the wires with solder. I place heat shrink over the longer section. Ready to solder - note the battery is live so I am careful to not touch any of the wires to each other. For the picture that yellow one is awfully close to the black one!

Soldering complete, I checked voltages, 3.5 V or so between Red and black and Red and Yellow/white as expected. I was careful to not let those solder points touch- battery is live!

Heat shink is heated and everything is insulated from one another.

Installed in player, orientation like original, wires exit the battery holder from the connector side.

Pono boots up and working fine, recharges via USB.

#2- Solder Example. I simply cut the connectors off each battery and soldered the old to the new. Easy and reliable. Less than 30 minutes including to verify voltages etc...
Same thing, using second listed battery. Works fine.

#3 - Coupler Example. I did this and kind of regret it. This is risky and requires skill and dexterity. I only tried it because I was looking for a no tool solution. This uses less tools (no soldering required) but is NOT Recommended! Very tiny parts may require magnification and a steady hand/ practice with the coupler is required.
Coupler obtained from Amazon. https://www.amazon.com/dp/B0DGLJJRZ5?th=1


Below is the new battery, I cut off the new (white) connetor. I want to use the old (black) connector from the used up battery.


Sharp blades are pushed down to slice through insulation and contact wires in the lower section. There was no need to remove any insulation from the wires. I did each wire individually, I put in a wire and gently pushed (with pliers) the metal part which lies over that the wire in to sort of half slice into the wire, the opposite side sticks up, like a ramp. Then I did another next and so on. When they are all half done I pressed the knife contacts in all the way and put on the cover. It takes practice- I used about 5 units before getting the hang of it. Of course soldering would be a lot better and thinner but I wanted to try something relatively tool-less. This was extremely frustrating at first. 
In the coupler version I had to install the battery opposite of its initial orientation to place the coupler internally in a manner to have enough clearance to install the back cover. This required a long cable and I just had enough length. 

Assuming postal regulations are followed, new batteries ship in a depleted state. So when I connected the battery (coupler example) the Pono would not turn on. But it did charge up when connected to the charger. Now working fine. The other battery (solder example) was received with sufficient charge to operate the Pono.
===Old Web Page/ Now out of Date===
| Stock Status | Inventory Level |
| We have a ton of these | |
| We have a quite a few | |
| We are running low | |
| >>Current Status>> |
No Batteries Left. Reorder Not Planned. Prices have more than doubled. It would be $40 or more for each battery. |
NOTE: Batteries are not available but how is your 12+ year old Pono Player doing? On ours the rubberized outer shell is "dissolving" or aging and becoming sticky and decomposed. How are your Pono shells out there? email us admin01@surfcables.com with your comments on how the Pono has aged, what you have done to fix it up etc... Despite this ours works perfectly by the way.
We previously offeried drop-in replacement Pono Player batteries.
Shipping was included in the price. USA sales only, no international (as per below).
Batteries were mostly discharged when shipped.
Please read the following carefully!
#1 You will have to open up your Pono Player to replace the battery. This will void the warranty (not a big deal since Pono is defunct and not providing warranty service anyway), and is fairly easy. To view a video on how to open the Pono Player, please click this link for a video.
#2 The Pono Player uses a Lithium Ion rechargeable battery, which is extremely powerful. All Lithium Ion batteries pose a risk of fire/injury if handled improperly. Therefore purchase these batteries at your own risk, we will not be responsible for damage/injury caused by these batteries. In order to purchase you WILL HAVE TO AGREE to the following disclaimer and release of liability:
This order is for a lithium-ion battery ("product"). The Product is inherently flammable and dangerous. By ordering or using this product, purchaser and /or recipient agrees to assume all liability resulting from this product, and agrees to dispose of product in compliance with applicable laws and regulations. Product should be charged with standard usb 5.0 volt charger, not pono player wall charger. This product is provided 'as is' and is without any warranty, express or implied. Recipient agrees to hold surf cables harmless For any claim of any nature resulting from use of this product. Limitation on damages: Surf Cables LLC shall not be liable for any incidental or consequential damages for breach of any express or implied warranty on this product.
#3 These batteries include the proper connecting cable and connector so once the player is open, simply unplug the original 2600 mAh battery and plug in the replacement. The player should then snap back together with no problem. Dispose of your original battery properly!
#4. For some reason, the Pono Player USB wall charger actually charges at 5.2 volts instead of the standard 5.0 volts for USB. We recommend using a standard 5.0 volt USB charger instead of the Pono Player wall charger. The batteries charge to less than 5 volts at full charge so the only down side is charging time, not capacity.
We have received numerous emails disbelieveing the Pono charger uses 5.2 volts, but then confirming it after the sender actually measured the voltages that were used for charging from the Pono adapter. So we believe we are correct.
Also for some unknown reason the battery charging circuit in the Pono is a little wacky. It will charge slower when the Pono is powered up and then plugged in. It will charge faster if it is (1) powered off and then plugged in, or (2) powered off, then plugged in and then powered on while plugged in.
#5. Environmental regulations prohibit AIR SHIPPING, require special labels and packaging and PROHIBIT SALES OUTSIDE USA. These will ship USPS regular mail and to USA addresses ONLY.
Technical information:
The original Pono 2600 mAh batteries charge at about 5.2V/ 0.93A from the wall charger to 4.16V when fully charged.
These replacement batteries are higher capacity, slightly over 3000 mAh, charging at 1.3A and please use a standard 5.0V USB charger instead of the original Pono wall charger. They also charge to 4.16V when fully charged. In our "high demand" test, using a balanced mode output to dual 68 ohm resistors (volume = -5), on continuous repeat, the larger batteries lasted about 15-20 minutes longer than the standard battery. You should get at least 300 minutes out of this battery before needing to recharge.
Here is some test information.

